Netgear Powerline 1200 Setup
Looking for a way to extend your network through existing electrical wiring? Well, look no further than a Netgear Powerline 1200 adapter. Plugging two or more Powerline adapters into wall sockets helps to establish a wired network connection. But, achieving all this requires some steps to be followed. Are you finding it difficult to execute those steps? Worry not! This page sums up the Netgear Powerline 1200 setup process in the easiest way. All that is required from your end is careful execution of the instructions mentioned in this guide.
Netgear Powerline 1200 Setup Instructions
Step 1: Unpack Your Adapter
Let’s start from the very initial step i.e. the unpacking of your Netgear Powerline 1200 adapters. Inside the box, you’ll find two Netgear Powerline 1200 adapters, a pair of Ethernet cables, and a quick start guide. Be careful during the unboxing process. We don’t want you to damage the hardware of your Powerline adapter in excitement.
Step 2: Power Up Your Adapter
As soon as you’re done with the unboxing of your Netgear Powerline 1200 adapters, consider connecting one adapter to the wall socket. Make sure you directly insert the adapter into the wall outlet. No surge protectors are needed. After some time, you will observe that the Pick a Plug LED on your Powerline adapter has started flashing. If that is true, you can move to the next step of doing Netgear Powerline 1200 setup.
Call Toll Free for Support: 1-833-933-7468
Step 3: Connect the Adapter to the AP
Now, it is time to create a connection between your Netgear Powerline 1200 adapter and the host AP. The connection can be wired or wireless. However, keep in mind to create a stable connection. Else, it won’t take much time for Netgear Powerline 1200 setup issues to emerge. As soon as you are done connecting your adapter to the AP, consider connecting the second Powerline adapter to the wall socket and switch it on.
This completes the extension of the existing home network with the aid of a wired medium via an adapter and hence the Netgear Powerline 1200 setup procedure. Now, you can also perform Netgear extender setup via www.mywifiext.net. All that you need to do is create a connection between the extender and Powerline adapter. You are advised to seek our expert’s help if any issue knocks at your door while configuring your Netgear Powerline adapter.
Want to Add More Adapters After Netgear Powerline 1200 Setup?
After getting your Netgear Powerline 1200 configured, you can add more adapters to your home network. If you haven’t tweaked the settings of your devices after completing the Netgear Powerline 1200 setup, the following steps will assist you with the process of adding new adapters to the network:
- Locate a power outlet nearby your existing Netgear Powerline 1200 adapter.
- Now, insert your new Powerline adapter into the power outlet you’ve just found.
- Power it up.
- Now, locate the Security button on your Netgear Powerline 1200 and press it.
- Similarly, press the Security button on the new Powerline adapter too.
The addition of a new Powerline adapter to the home network completes here. Now, you’ll have internet access to all of your devices.
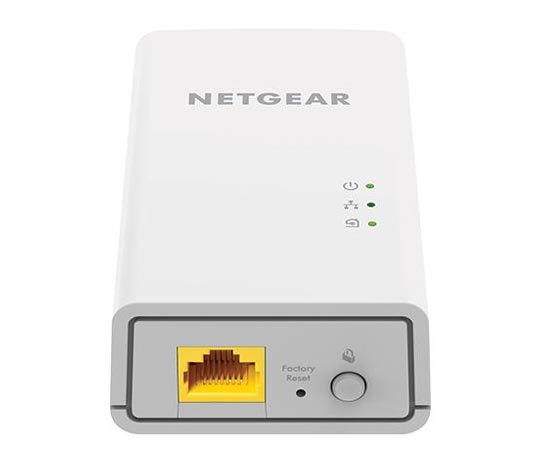
Netgear Powerline 1200 LEDs
This section reveals all the secrets regarding the LED lights on your Netgear Powerline adapter. Knowing about the lights will also help you resolve Netgear Powerline 1200 setup issues if you get stumbled upon any. Here are the LED descriptions of your Netgear Powerline adapter:
1. Power LED
It reveals the status of the power being received by your Netgear Powerline adapter. It can either flash green color or amber. The solid green status of the Power LED determines that your adapter is getting enough electricity. However, it remains amber in a few cases. Know that if the Power LED is off, it means no electricity is being received by your Powerline device.
2. Ethernet LED
The Ethernet LED located on your Netgear Powerline adapter tells whether the status of the Ethernet connection is good to go or not. If it is flashing green, the Ethernet port is perfectly linked to another device. In case it is off, then you are supposed to repair the Ethernet cable so that Netgear Powerline 1200 setup can be done easily.
3. Pick A Plug LED
Do you remember the name of the LED light mentioned during the Netgear Powerline 1200 setup procedure? Pick A Plug LED it was. The purpose of this LED is to help you select the electrical socket where your Powerline adapter will receive the strongest signal from the existing AP. The colors flashed by this LED light are red, amber, and green which indicate that the signal strength is good, better, and best respectively. If it is off, then you may conclude that your extender is unable to find the device that is running on the same encryption key.
Apart from these LED lights, your adapter also has two buttons labeled Factory Reset and Security. The Factory Reset button returns the adapter to the factory default settings whereas the Security button serves the purpose of adding new adapters after completing the Netgear Powerline 1200 setup process. In case you require more help regarding the Netgear Powerline 1200 adapter, you’re more than welcome to contact our experts.